คอมไพล์ใหม่ OpenSSL 1.1 & NGINX 1.25 สำหรับ TLS 1.3 -CentOS 7) ตามสถานการณ์ที่คุณติดตั้งไว้แล้วบนเซิร์ฟเวอร์ o เวอร์ชันเก่ากว่า openssl เกี่ยวข้องกับบริการ Nginx
เนื้อหา
โดยเฉพาะอย่างยิ่งคุณสามารถเปิดใช้งาน OpenSSL 1.1.1t สำหรับบริการ NGINXทำงานด้วยเวอร์ชันเก่า OpenSSL 1.0.2k-
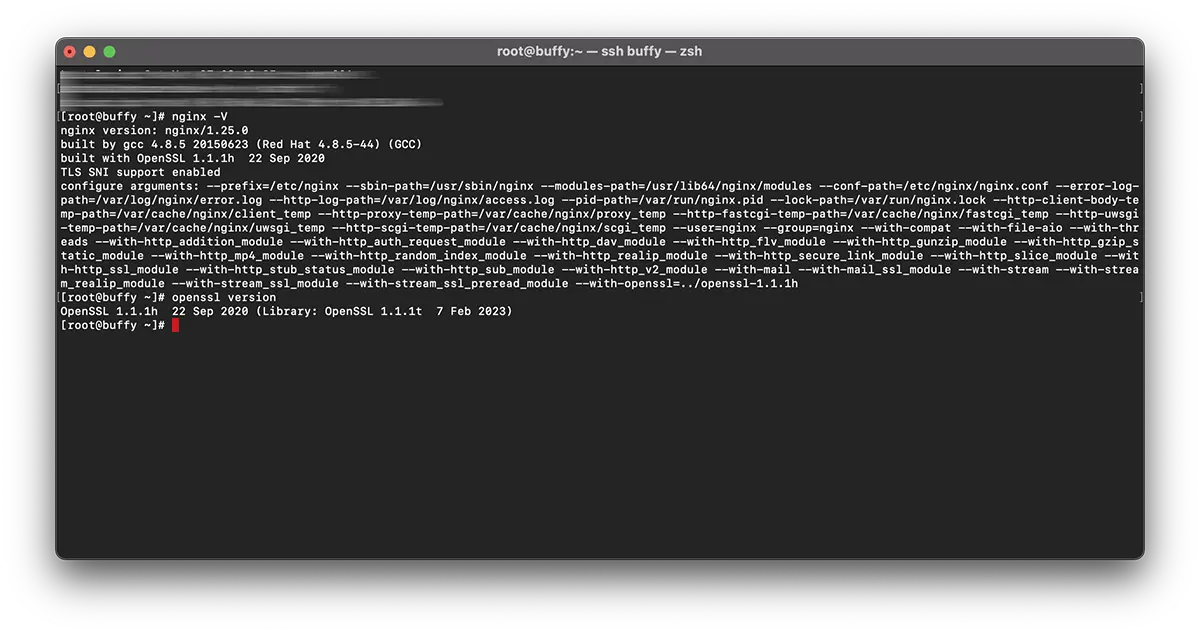
# nginx -V
nginx version: nginx/1.25.0
built by gcc 4.8.5 20150623 (Red Hat 4.8.5-44) (GCC)
built with OpenSSL 1.0.2k-fips  26 Jan 2017
TLS SNI support enabled
# openssl version -a
OpenSSL 1.1.1t 7 Feb 2023ซึ่งหมายความว่าบนเซิร์ฟเวอร์มีสองเวอร์ชันที่แตกต่างกัน OpenSSL- เวอร์ชันที่ติดตั้งบนระบบโดย “yum” -1.0.2k-fips) และเวอร์ชัน OpenSSL ติดตั้งโดยการรวบรวมด้วยตนเอง -openssl 1.1.1t-
คลาสสิกแนะนำการติดตั้งใหม่มากที่สุด ‘OpenSSL‘ ในระดับ server ที่เกี่ยวข้องกับการดำเนินการตามคำสั่ง: yum remove openssl- แต่มีปัญหาใหญ่ที่นี่ ด้วยการถอนการติดตั้งเวอร์ชันเก่า OpenSSLมันอาจจำเป็นต้องถอนการติดตั้งแอปพลิเคชันที่ต้องติดตั้ง ชอบ: nginx, MariaDB-server, cerbotบวกอีกมากมาย
ทางออกที่ง่ายกว่าคือการคอมไพล์ใหม่ openssl 1.1 & nginx 1.25 สำหรับ TLS 1.3-
บทช่วยสอน recompilare OpenSSL 1.1 & NGINX 1.25 สำหรับ TLS 1.3 (CentOS 7)
ในตัวอย่างของฉัน recomdillation มีไว้สำหรับ nginx/1.25.0 & OpenSSL 1.1.1h ใช้ร้านหนังสือ OpenSSL 1.1.1t-
recompilare nginx
1. สร้างไฟล์: nginx-with-tls13-compile.sh
sudo nano nginx-with-tls13-compile.shที่คุณเพิ่มสคริปต์:
#!/bin/bash

## nginx
NGINX=nginx-1.25.0.tar.gz

if [ ! -f "${NGINX}" ];then
    wget https://nginx.org/download/${NGINX}
fi

ND=$(basename $NGINX .tar.gz)
if [ ! -d "${ND}" ];then
    tar zxvf ${NGINX}
fi

cd ${ND}

## pre require package
## yum install gcc pcre-devel zlib-devel

./configure --prefix=/etc/nginx \
    --sbin-path=/usr/sbin/nginx \
    --modules-path=/usr/lib64/nginx/modules  \
    --conf-path=/etc/nginx/nginx.conf \
    --error-log-path=/var/log/nginx/error.log \
    --http-log-path=/var/log/nginx/access.log \
    --pid-path=/var/run/nginx.pid \
    --lock-path=/var/run/nginx.lock \
    --http-client-body-temp-path=/var/cache/nginx/client_temp \
    --http-proxy-temp-path=/var/cache/nginx/proxy_temp \
    --http-fastcgi-temp-path=/var/cache/nginx/fastcgi_temp \
    --http-uwsgi-temp-path=/var/cache/nginx/uwsgi_temp \
    --http-scgi-temp-path=/var/cache/nginx/scgi_temp \
    --user=nginx \
    --group=nginx \
    --with-compat \
    --with-file-aio \
    --with-threads \
    --with-http_addition_module \
    --with-http_auth_request_module \
    --with-http_dav_module \
    --with-http_flv_module \
    --with-http_gunzip_module \
    --with-http_gzip_static_module \
    --with-http_mp4_module \
    --with-http_random_index_module \
    --with-http_realip_module \
    --with-http_secure_link_module \
    --with-http_slice_module \
    --with-http_ssl_module \
    --with-http_stub_status_module \
    --with-http_sub_module \
    --with-http_v2_module \
    --with-mail \
    --with-mail_ssl_module \
    --with-stream \
    --with-stream_realip_module \
    --with-stream_ssl_module \
    --with-stream_ssl_preread_module \
    --with-openssl=../$(basename $OPENSSL .tar.gz)

make

sudo make install

nginx -V
บันทึกไฟล์ใหม่
2. สร้างไฟล์ปฏิบัติการใหม่:
chmod +x nginx-with-tls13-compile.shเขียนใหม่ nginx.service
3. คุณทำการสำรองข้อมูล nginx.service-
cat /lib/systemd/system/nginx.service > /srv/nginx_service.txt(คุณสามารถเลือกเส้นทางที่คุณต้องการได้ nginx_service.txt-
4. สร้างไฟล์สำหรับบริการ nginx- nginx.service
sudo nano nginx.service5. ในไฟล์ไฟล์ใหม่ nginx.service เพิ่มบรรทัด:
##  /lib/systemd/system/nginx.service

[Unit]
Description=The NGINX HTTP and reverse proxy server
After=syslog.target network.target remote-fs.target nss-lookup.target

[Service]
Type=forking
PIDFile=/run/nginx.pid
ExecStartPre=/usr/sbin/nginx -t
ExecStart=/usr/sbin/nginx
ExecReload=/usr/sbin/nginx -s reload
ExecStop=/bin/kill -s QUIT $MAINPID
PrivateTmp=true

[Install]
WantedBy=multi-user.target
6. คัดลอกไฟล์ใน ‘daemon“-
sudo cp nginx.service /lib/systemd/system/nginx.service7. หลังจากคัดลอกไฟล์แล้วให้อัปเดตสิทธิ์ไฟล์โดยใช้คำสั่งซื้อ:
sudo chmod 644 /lib/systemd/system/nginx.service8. โหลดการกำหนดค่าใหม่ systemd เพื่อพิจารณาการเปลี่ยนแปลงโดยใช้คำสั่ง:
sudo systemctl daemon-reload9. รีสตาร์ท ngnix-
sudo systemctl restart nginxคอมไพล์ใหม่ OpenSSL / NGINX สำหรับ TLS 1.3
10. ในโฟลเดอร์เดียวกันที่คุณมีไฟล์ nginx-with-tls13-compile.sh และ nginx.serviceสร้างไฟล์ใหม่: openssl-1.1-compile.sh-
sudo nano openssl-1.1-compile.shเพิ่มสคริปต์:
#!/bin/bash

## Compile OpenSSL
OPENSSL=openssl-1.1.1h.tar.gz

DONE=openssl-compile-done

if [ ! -f "${DONE}" ] ;then
    wget https://www.openssl.org/source/${OPENSSL}

    tar zxvf ${OPENSSL}

    cd $(basename $OPENSSL .tar.gz)

    ./config shared no-idea no-md2 no-mdc2 no-rc5 no-rc4 --prefix=/usr/local/

    make

    sudo make install

    cd ..

    touch ${DONE}
fi

export LD_LIBRARY_PATH=$LD_LIBRARY_PATH:/usr/local/lib64/

read -n1 -r -p "$(/usr/local/bin/openssl version) - Press any key to continue..." key

source ./nginx-with-tls13-compile.sh
แทนที่ “OPENSSL=openssl-1.1.1h.tar.gz” ด้วยเวอร์ชันที่คุณต้องการติดตั้งและคอมไพล์อีกครั้งด้วย Nginx
11. สร้างสคริปต์ที่ใช้งานได้:
chmod +x openssl-1.1-compile.sh12. ดำเนินการตามคำสั่ง:
./openssl-1.1-compile.shรอจนกว่ากระบวนการคอมไพล์ใหม่จะเสร็จสมบูรณ์ OpenSSL & NGINX-
หากเราสามารถช่วยคุณหรือจะทำให้สำเร็จช่องแสดงความคิดเห็นเปิดอยู่