
재컴파일 OpenSSL 1.1 & NGINX 1.25 ~을 위한 TLS 1.3 (CentOS 7), 서버에 이미 설치한 시나리오에 따라 o 이전 버전 openssl nginx 서비스와 연결되어 있습니다.
콘텐츠
좀 더 구체적으로 활성화하려면 OpenSSL 1.1.1t 서비스를 위해 NGINX, 이전 버전에서 실행됩니다. OpenSSL 1.0.2k.
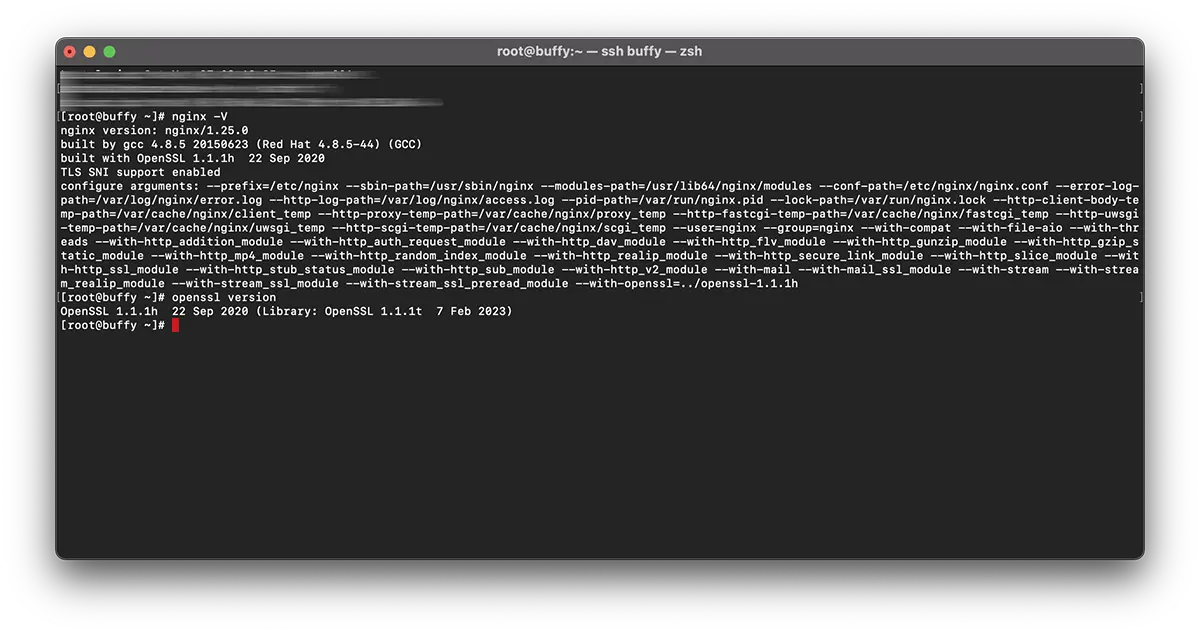
# nginx -V
nginx version: nginx/1.25.0
built by gcc 4.8.5 20150623 (Red Hat 4.8.5-44) (GCC)
built with OpenSSL 1.0.2k-fips  26 Jan 2017
TLS SNI support enabled
# openssl version -a
OpenSSL 1.1.1t 7 Feb 2023이는 두 가지 다른 버전이 있음을 의미합니다. OpenSSL. 다음을 통해 시스템에 설치된 버전 “yum” (1.0.2k-fips) 및 버전 OpenSSL 수동 컴파일로 설치 (openssl 1.1.1t).
일반적으로 대부분은 재설치를 권장합니다. ‘OpenSSL‘ 서버 수준에서. 여기에는 다음 명령 실행이 포함됩니다. yum remove openssl. 하지만 여기에는 큰 문제가 있습니다. 이전 버전을 제거하면 OpenSSL, 일부 종속 앱을 제거해야 할 수도 있습니다. 와 같은: nginx, MariaDB-server, cerbot, 그리고 더 많은 것.
더 간단한 해결책은 다시 컴파일하는 것입니다. openssl 1.1 & nginx 1.25 ~을 위한 TLS 1.3.
튜토리얼 재컴파일 OpenSSL 1.1 & NGINX 1.25 ~을 위한 TLS 1.3 (CentOS 7)
내 예에서 재컴파일은 다음과 같습니다. nginx/1.25.0 & OpenSSL 1.1.1h 서점 이용 OpenSSL 1.1.1t.
NGINX를 다시 컴파일하세요.
1. 파일을 생성합니다: nginx-with-tls13-compile.sh
sudo nano nginx-with-tls13-compile.sh스크립트를 추가하는 위치:
#!/bin/bash

## nginx
NGINX=nginx-1.25.0.tar.gz

if [ ! -f "${NGINX}" ];then
    wget https://nginx.org/download/${NGINX}
fi

ND=$(basename $NGINX .tar.gz)
if [ ! -d "${ND}" ];then
    tar zxvf ${NGINX}
fi

cd ${ND}

## pre require package
## yum install gcc pcre-devel zlib-devel

./configure --prefix=/etc/nginx \
    --sbin-path=/usr/sbin/nginx \
    --modules-path=/usr/lib64/nginx/modules  \
    --conf-path=/etc/nginx/nginx.conf \
    --error-log-path=/var/log/nginx/error.log \
    --http-log-path=/var/log/nginx/access.log \
    --pid-path=/var/run/nginx.pid \
    --lock-path=/var/run/nginx.lock \
    --http-client-body-temp-path=/var/cache/nginx/client_temp \
    --http-proxy-temp-path=/var/cache/nginx/proxy_temp \
    --http-fastcgi-temp-path=/var/cache/nginx/fastcgi_temp \
    --http-uwsgi-temp-path=/var/cache/nginx/uwsgi_temp \
    --http-scgi-temp-path=/var/cache/nginx/scgi_temp \
    --user=nginx \
    --group=nginx \
    --with-compat \
    --with-file-aio \
    --with-threads \
    --with-http_addition_module \
    --with-http_auth_request_module \
    --with-http_dav_module \
    --with-http_flv_module \
    --with-http_gunzip_module \
    --with-http_gzip_static_module \
    --with-http_mp4_module \
    --with-http_random_index_module \
    --with-http_realip_module \
    --with-http_secure_link_module \
    --with-http_slice_module \
    --with-http_ssl_module \
    --with-http_stub_status_module \
    --with-http_sub_module \
    --with-http_v2_module \
    --with-mail \
    --with-mail_ssl_module \
    --with-stream \
    --with-stream_realip_module \
    --with-stream_ssl_module \
    --with-stream_ssl_preread_module \
    --with-openssl=../$(basename $OPENSSL .tar.gz)

make

sudo make install

nginx -V
새 파일을 저장합니다.
2. 새 실행 파일을 만듭니다.
chmod +x nginx-with-tls13-compile.sh고쳐 쓰기 nginx.service
3. 백업을 만드세요 nginx.service.
cat /lib/systemd/system/nginx.service > /srv/nginx_service.txt(원하는 경로를 선택할 수 있습니다. nginx_service.txt))
4. 서비스용 파일 생성 nginx: nginx.service
sudo nano nginx.service5. 파일에서 새 파일 nginx.service 다음 줄을 추가하세요.
##  /lib/systemd/system/nginx.service

[Unit]
Description=The NGINX HTTP and reverse proxy server
After=syslog.target network.target remote-fs.target nss-lookup.target

[Service]
Type=forking
PIDFile=/run/nginx.pid
ExecStartPre=/usr/sbin/nginx -t
ExecStart=/usr/sbin/nginx
ExecReload=/usr/sbin/nginx -s reload
ExecStop=/bin/kill -s QUIT $MAINPID
PrivateTmp=true

[Install]
WantedBy=multi-user.target
6. 파일을 다음 위치에 복사하세요. ‘daemon“.
sudo cp nginx.service /lib/systemd/system/nginx.service7. 파일이 복사된 후 다음 명령을 사용하여 파일 권한을 업데이트합니다.
sudo chmod 644 /lib/systemd/system/nginx.service8. 구성을 다시 로드합니다. systemd 다음 명령을 사용하여 변경 사항을 고려합니다.
sudo systemctl daemon-reload9. 다시 시작 ngnix.
sudo systemctl restart nginx재컴파일 OpenSSL / NGINX ~을 위한 TLS 1.3
10. 파일이 있는 동일한 폴더에 nginx-with-tls13-compile.sh 그리고 nginx.service, 새 파일을 만듭니다. openssl-1.1-compile.sh.
sudo nano openssl-1.1-compile.sh스크립트를 추가합니다.
#!/bin/bash

## Compile OpenSSL
OPENSSL=openssl-1.1.1h.tar.gz

DONE=openssl-compile-done

if [ ! -f "${DONE}" ] ;then
    wget https://www.openssl.org/source/${OPENSSL}

    tar zxvf ${OPENSSL}

    cd $(basename $OPENSSL .tar.gz)

    ./config shared no-idea no-md2 no-mdc2 no-rc5 no-rc4 --prefix=/usr/local/

    make

    sudo make install

    cd ..

    touch ${DONE}
fi

export LD_LIBRARY_PATH=$LD_LIBRARY_PATH:/usr/local/lib64/

read -n1 -r -p "$(/usr/local/bin/openssl version) - Press any key to continue..." key

source ./nginx-with-tls13-compile.sh
바꾸다 “OPENSSL=openssl-1.1.1h.tar.gz” 설치하려는 버전으로 설정하고 NGINX로 다시 컴파일하세요.
11. 스크립트를 실행 가능하게 만듭니다.
chmod +x openssl-1.1-compile.sh12. 다음 명령을 실행합니다.
./openssl-1.1-compile.sh재컴파일 프로세스가 완료될 때까지 기다립니다. OpenSSL & NGINX.
도움이 필요하거나 추가할 사항이 있으면 의견란을 열어주세요.
당신은 또한에 관심이있을 수 있습니다 ...
