
opnieuw compileren OpenSSL 1.1 & NGINX 1.25 voor TLS 1.3 ((CentOS 7), volgens het scenario waarin u al op de server o oudere versie openssl geassocieerd met de nginx-service.
inhoud
Meer specifiek om te kunnen activeren OpenSSL 1.1.1t voor de dienst NGINX, die draait met een oudere versie. OpenSSL 1.0.2k.
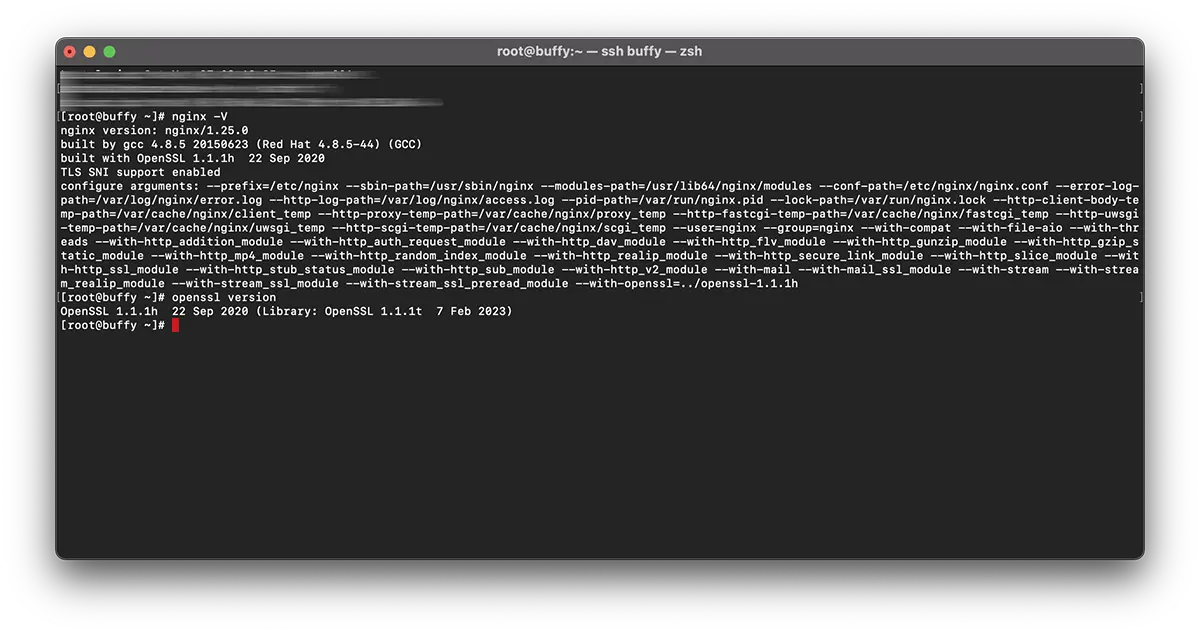
# nginx -V
nginx version: nginx/1.25.0
built by gcc 4.8.5 20150623 (Red Hat 4.8.5-44) (GCC)
built with OpenSSL 1.0.2k-fips  26 Jan 2017
TLS SNI support enabled
# openssl version -a
OpenSSL 1.1.1t 7 Feb 2023Dit betekent dat er twee verschillende versies van zijn OpenSSL. Een versie die op het systeem is geïnstalleerd via “yum” ((1.0.2k-fips) en een versie OpenSSL geïnstalleerd door handmatige compilatie ((openssl 1.1.1t).
Klassiek raden de meesten aan om opnieuw te installeren ‘OpenSSL‘ op serverniveau. Dit zou het uitvoeren van de opdracht inhouden: yum remove openssl. Maar er is hier een groot probleem. Met het verwijderen van de oude versie OpenSSL, moet u mogelijk ook enkele afhankelijke apps verwijderen. Zoals: nginx, MariaDB-server, cerbot, en nog veel meer.
Een eenvoudigere oplossing is opnieuw compileren openssl 1.1 & nginx 1.25 voor TLS 1.3.
Tutorial opnieuw compileren OpenSSL 1.1 & NGINX 1.25 voor TLS 1.3 (CentOS 7)
In mijn voorbeeld is de hercompilatie voor nginx/1.25.0 & OpenSSL 1.1.1h gebruik maken van boekwinkels OpenSSL 1.1.1t.
Compileer NGINX opnieuw.
1. Maak het bestand: nginx-with-tls13-compile.sh
sudo nano nginx-with-tls13-compile.shwaar je het script toevoegt:
#!/bin/bash

## nginx
NGINX=nginx-1.25.0.tar.gz

if [ ! -f "${NGINX}" ];then
    wget https://nginx.org/download/${NGINX}
fi

ND=$(basename $NGINX .tar.gz)
if [ ! -d "${ND}" ];then
    tar zxvf ${NGINX}
fi

cd ${ND}

## pre require package
## yum install gcc pcre-devel zlib-devel

./configure --prefix=/etc/nginx \
    --sbin-path=/usr/sbin/nginx \
    --modules-path=/usr/lib64/nginx/modules  \
    --conf-path=/etc/nginx/nginx.conf \
    --error-log-path=/var/log/nginx/error.log \
    --http-log-path=/var/log/nginx/access.log \
    --pid-path=/var/run/nginx.pid \
    --lock-path=/var/run/nginx.lock \
    --http-client-body-temp-path=/var/cache/nginx/client_temp \
    --http-proxy-temp-path=/var/cache/nginx/proxy_temp \
    --http-fastcgi-temp-path=/var/cache/nginx/fastcgi_temp \
    --http-uwsgi-temp-path=/var/cache/nginx/uwsgi_temp \
    --http-scgi-temp-path=/var/cache/nginx/scgi_temp \
    --user=nginx \
    --group=nginx \
    --with-compat \
    --with-file-aio \
    --with-threads \
    --with-http_addition_module \
    --with-http_auth_request_module \
    --with-http_dav_module \
    --with-http_flv_module \
    --with-http_gunzip_module \
    --with-http_gzip_static_module \
    --with-http_mp4_module \
    --with-http_random_index_module \
    --with-http_realip_module \
    --with-http_secure_link_module \
    --with-http_slice_module \
    --with-http_ssl_module \
    --with-http_stub_status_module \
    --with-http_sub_module \
    --with-http_v2_module \
    --with-mail \
    --with-mail_ssl_module \
    --with-stream \
    --with-stream_realip_module \
    --with-stream_ssl_module \
    --with-stream_ssl_preread_module \
    --with-openssl=../$(basename $OPENSSL .tar.gz)

make

sudo make install

nginx -V
Sla het nieuwe bestand op.
2. Maak het nieuwe uitvoerbare bestand:
chmod +x nginx-with-tls13-compile.shherschrijven nginx.service
3. Maak een back-up van nginx.service.
cat /lib/systemd/system/nginx.service > /srv/nginx_service.txt(je kunt elk pad kiezen dat je wilt nginx_service.txt))
4. Maak het bestand voor de service nginx: nginx.service
sudo nano nginx.service5. In het bestand het nieuwe bestand nginx.service voeg de regels toe:
##  /lib/systemd/system/nginx.service

[Unit]
Description=The NGINX HTTP and reverse proxy server
After=syslog.target network.target remote-fs.target nss-lookup.target

[Service]
Type=forking
PIDFile=/run/nginx.pid
ExecStartPre=/usr/sbin/nginx -t
ExecStart=/usr/sbin/nginx
ExecReload=/usr/sbin/nginx -s reload
ExecStop=/bin/kill -s QUIT $MAINPID
PrivateTmp=true

[Install]
WantedBy=multi-user.target
6. Kopieer het bestand naar ‘daemon“.
sudo cp nginx.service /lib/systemd/system/nginx.service7. Nadat het bestand is gekopieerd, werkt u de bestandsrechten bij met behulp van de opdracht:
sudo chmod 644 /lib/systemd/system/nginx.service8. Laad de configuratie opnieuw systemd om rekening te houden met de wijzigingen met behulp van het commando:
sudo systemctl daemon-reload9. Opnieuw opstarten ngnix.
sudo systemctl restart nginxopnieuw compileren OpenSSL / NGINX voor TLS 1.3
10. In dezelfde map waar u de bestanden heeft nginx-with-tls13-compile.sh en nginx.service, maak een nieuw bestand: openssl-1.1-compile.sh.
sudo nano openssl-1.1-compile.shVoeg het script toe:
#!/bin/bash

## Compile OpenSSL
OPENSSL=openssl-1.1.1h.tar.gz

DONE=openssl-compile-done

if [ ! -f "${DONE}" ] ;then
    wget https://www.openssl.org/source/${OPENSSL}

    tar zxvf ${OPENSSL}

    cd $(basename $OPENSSL .tar.gz)

    ./config shared no-idea no-md2 no-mdc2 no-rc5 no-rc4 --prefix=/usr/local/

    make

    sudo make install

    cd ..

    touch ${DONE}
fi

export LD_LIBRARY_PATH=$LD_LIBRARY_PATH:/usr/local/lib64/

read -n1 -r -p "$(/usr/local/bin/openssl version) - Press any key to continue..." key

source ./nginx-with-tls13-compile.sh
Vervangen “OPENSSL=openssl-1.1.1h.tar.gz” met de versie die u wilt installeren en opnieuw compileren met NGINX.
11. Maak het script uitvoerbaar:
chmod +x openssl-1.1-compile.sh12. Voer de opdracht uit:
./openssl-1.1-compile.shWacht tot het hercompilatieproces is voltooid OpenSSL & NGINX.
Als we u kunnen helpen of als er aanvullingen nodig zijn, staat het commentaargedeelte open.
Mogelijk bent u ook geïnteresseerd in...
