이 튜토리얼에서는 Debian 12에서 LEP를 설치하고 구성하기 위해 이동 해야하는 단계를 볼 수 있습니다. Ningb, Mariadb 및 PHP는 프레젠테이션 웹 호스팅에 필요한 소프트웨어 패키지, 프레젠테이션 웹 사이트, 블로그 또는 온라인 상점 등 소프트웨어 패키지입니다.
콘텐츠
Lemp는 Linux, Nginx, MySQL/Mariadb, PHP의 약어이며 전 세계의 많은 웹 프로젝트 및 웹 응용 프로그램의 기초입니다. StealthSetots.com 뒤에있는이 기사를 볼 수 없었습니다.이 기사를 볼 수 없었습니다.
데비안은 안정성, 보안 및 유연성으로 유명한 Linux를 기반으로 한 오픈 소스 운영 체제입니다. 오랜 역사와 활발한 개발자 커뮤니티를 통해 Debian은 다양한 소프트웨어 패키지 및 서점을 제공하여 다양한 사용자의 요구를 충족시킵니다. 이 운영 체제는 일반적으로 회사에 신뢰할 수 있고 효율적인 서버를 만드는 데 사용되지만 개인 용도에도 적응할 수도 있습니다.
Debian 12에서 Lemp를 설치하고 구성하는 방법
Debian 12에 LEP를 설치하고 설정하기 전에 수행 해야하는 첫 번째 단계는 SSH를 통해 서버에 연결하는 것입니다 (또는 로컬 액세스가있는 경우 콘솔에서 직접). CPANEL, VESTACP 또는 기타와 같은 이미 설치된 LEMP 패키지 또는 관리 시스템이 있는지 확인하십시오.
이 튜토리얼의 명령 세트는 다음과 같습니다 “sudo“그러나 사용자와 함께 서버에 연결된 경우 “root“, 필요하지 않습니다 “sudo” 명령 줄 앞에서. 명령 “sudo” 명령 줄 앞에서 일반 사용자에게 일시적으로 상위 투자 권한을 부여하여 특수 권한이 필요한 주문을 실행하거나 소프트웨어 설치 또는 구성, 시스템 관리 또는 기타 민감한 작업 수행과 같은 보호 자원에 대한 주문을 실행할 수 있습니다.
업데이트 소프트웨어.
램프 설치를 시작하기 전에 운영 체제와 이미 설치된 소프트웨어 패키지를 모두 업데이트하는 것이 좋습니다.
sudo apt update
sudo apt upgrade
업데이트에 사용할 수있는 패키지가 있으면 누르십시오 “Y” 질문을 받으면 :
Do you want to continue? [Y/n] YDebian 12의 설치 및 설정 Ningin 웹 서버
웹서버가 방문자에게 웹페이지를 제공하기 위해서는, Nginx Web Server 올바르게 설치하고 구성해야합니다.
sudo apt install nginx타자 “Y” Nginx 웹 서버 설치를 확인합니다.
Do you want to continue? [Y/n] Y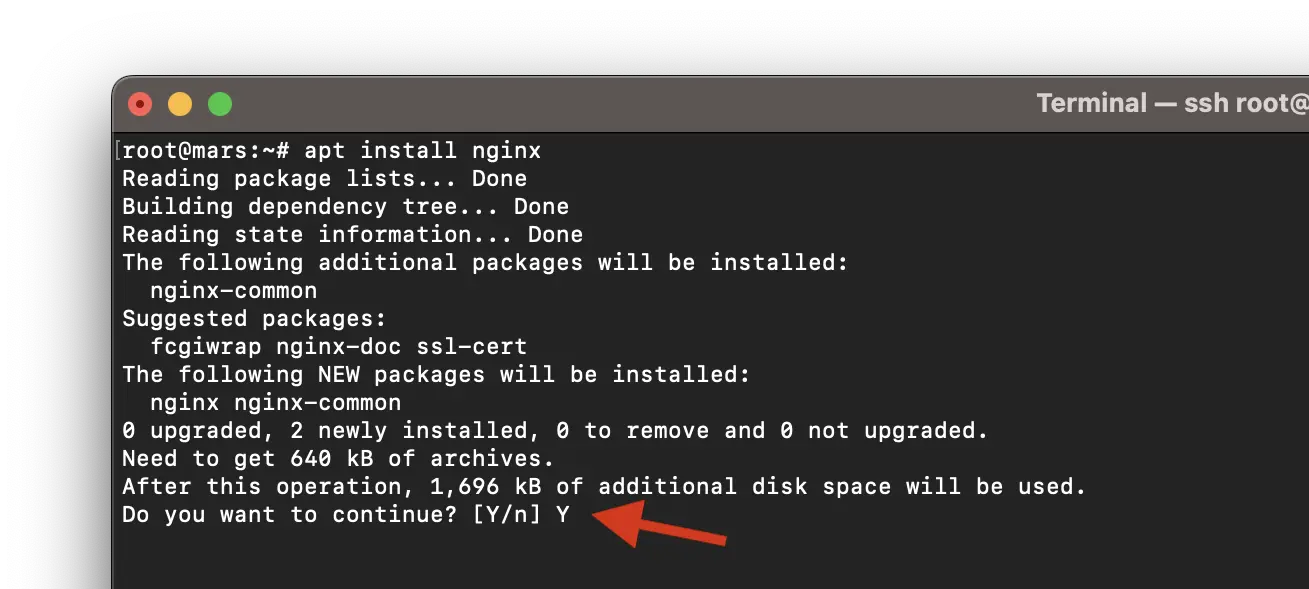
설치 프로세스가 끝나면 다음 줄이 표시됩니다.
Setting up nginx-common (1.22.1-9) ...
Created symlink /etc/systemd/system/multi-user.target.wants/nginx.service → /lib/systemd/system/nginx.service.
Setting up nginx (1.22.1-9) ...
Upgrading binary: nginx.
Processing triggers for man-db (2.11.2-2) ...
마지막으로 모든 것이 제대로 작동하는지 확인하려면 다음 주소로 이동하세요. IP 웹 브라우저에서. http://your_server_ip.
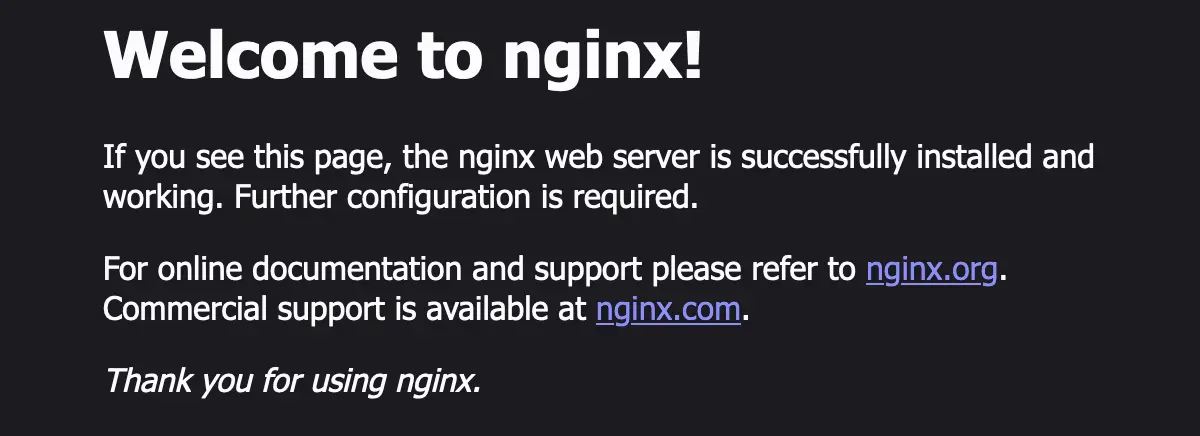
Nginx 서비스가 서버에서 실행 중이며 웹 페이지를 제공할 준비가 되었습니다.
관련:
Debian 12의 설치 및 설정 MariaDB 서버
MariaDB는 MySQL에 비해 향상된 성능, 더 빠른 복제 속도, 향상된 보안 조치 및 추가 스토리지 엔진을 제공합니다.
아래 명령줄을 실행하고 다음을 입력하세요. “Y” 설치를 확인하기 위해 MariaDB Server.
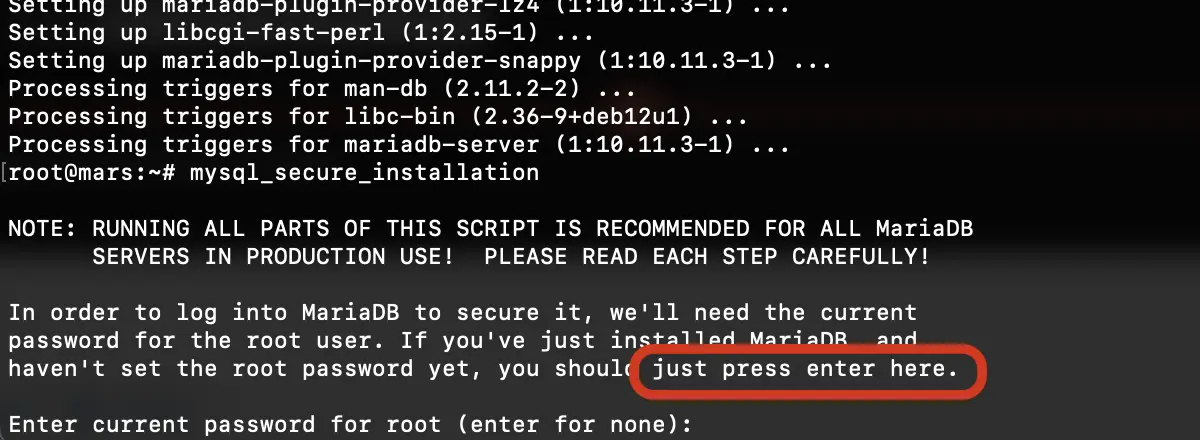
sudo apt install mariadb-server설치 후 스크립트를 실행하여 Mariadb 서버를 보호해야합니다. mysql_secure_installation. 서버에 대한 액세스를 제한하면 사용하지 않은 계정이 제거됩니다.
명령 줄 실행 :
sudo mysql_secure_installation압박 “Enter” 사용자의 현재 비밀번호 “root“.
Switch to unix_socket authentication [Y/n] Y비밀번호를 설정합니다 MariaDB:
Change the root password? [Y/n] Y
New password:
Re-enter new password:
Password updated successfully!
Reloading privilege tables..
 ... Success!
다음으로 설치 중에 기본값을 설정하는 권한 및 데이터베이스를 삭제합니다. MariaDB Server.
Remove anonymous users? [Y/n] Y
 ... Success!

Normally, root should only be allowed to connect from 'localhost'.  This
ensures that someone cannot guess at the root password from the network.

Disallow root login remotely? [Y/n] Y
 ... Success!

By default, MariaDB comes with a database named 'test' that anyone can
access.  This is also intended only for testing, and should be removed
before moving into a production environment.

Remove test database and access to it? [Y/n] Y
 - Dropping test database...
 ... Success!
 - Removing privileges on test database...
 ... Success!

Reloading the privilege tables will ensure that all changes made so far
will take effect immediately.

Reload privilege tables now? [Y/n] Y
 ... Success!

Cleaning up...

All done!  If you've completed all of the above steps, your MariaDB
installation should now be secure.

Thanks for using MariaDB!
계정에 대한 위의 비밀번호 “root” 서버를 원격으로 인증 할 때 필요합니다. 원격. 이것은 암호입니다 MariaDB.
SQL Server 설치를 테스트하십시오.
root@mars:~# mysql
Welcome to the MariaDB monitor.  Commands end with ; or \g.
Your MariaDB connection id is 41
Server version: 10.11.3-MariaDB-1 Debian 12

Copyright (c) 2000, 2018, Oracle, MariaDB Corporation Ab and others.

Type 'help;' or '\h' for help. Type '\c' to clear the current input statement.

MariaDB [(none)]> select version();
+-------------------+
| version()         |
+-------------------+
| 10.11.3-MariaDB-1 |
+-------------------+
1 row in set (0.000 sec)

MariaDB [(none)]> quit
Bye
root@mars:~#
Debian 12의 설치 및 설정 PHP / PHP-FPM
Dacă totul a funcționat bine până la acest pas, pentru ca să instalezi și configurezi LEMP pe Debian 12, este nevoie și de software-ul PHP. Pentru suport PHP la Nginx este nevoie să instalezi și PHP-FPM.
sudo apt install php-fpm php-mysql php-gd php-cli php-curl php-mbstring php-zip php-opcache php-xml설치 프로세스가 완료 될 때까지 기다리십시오 PHP-FPM, 가장 중요한 PHP 모듈과 함께.
결국 내 튜토리얼에서 나는 설치했다. PHP 8.2 운영 체제 Debian 12.
root@mars:~# php -v
PHP 8.2.7 (cli) (built: Jun  9 2023 19:37:27) (NTS)
Copyright (c) The PHP Group
Zend Engine v4.2.7, Copyright (c) Zend Technologies
    with Zend OPcache v8.2.7, Copyright (c), by Zend Technologies
root@mars:~#
현재 LEP의 모든 요소가 설치되었지만 여전히 구성해야합니다. Nginx PHP 파일을 실행합니다.
PHP 파일을 실행하기위한 NGINX 구성
페이지에 ningx를 설정합니다 “기본”, 편집 “/etc/nginx/sites-enabled/default“. 나는 선호한다 “nano” 편집 용.
대체 “location /” 선:
location / {
    # First attempt to serve request as file, then
    # as directory, then fall back to displaying a 404.
    try_files $uri $uri/ =404;
     }
라인으로 :
location / {
    try_files $uri $uri/ /index.php?$args;
    }
다음으로 아래 줄을 블록에 추가하십시오 “server” Nginx가 PHP를 처리하도록 허용합니다.
location ~ \.php$ {
     include snippets/fastcgi-php.conf;
     fastcgi_pass unix:/var/run/php/php-fpm.sock;
     }
}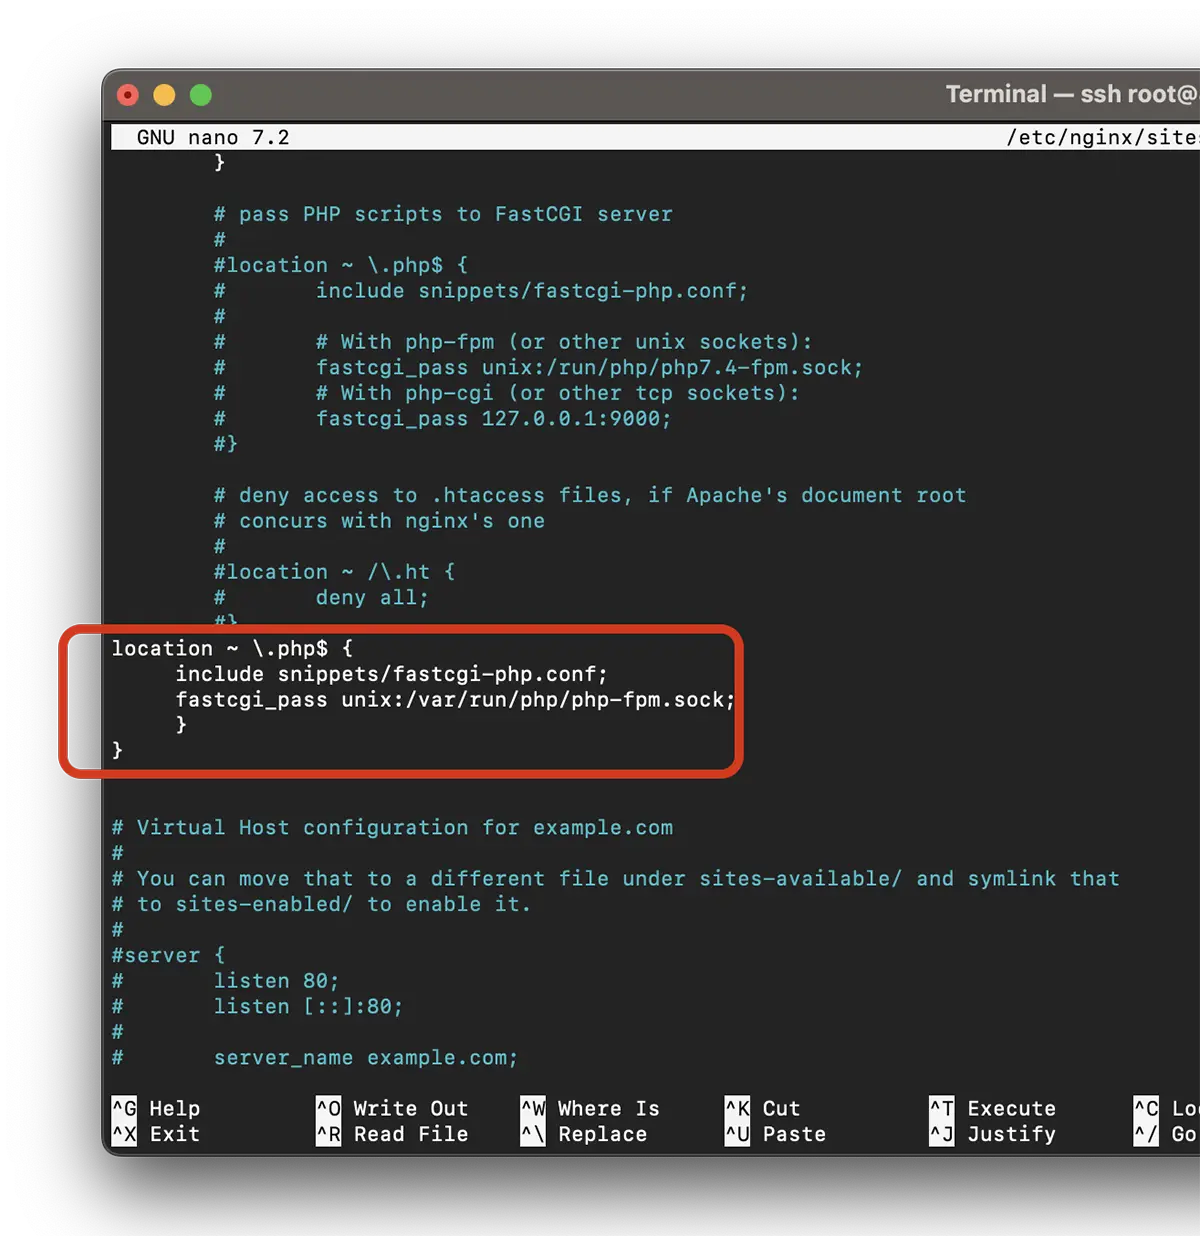
파일을 저장하고 구성을 확인하십시오.
root@mars:~# nginx -t
nginx: the configuration file /etc/nginx/nginx.conf syntax is ok
nginx: configuration file /etc/nginx/nginx.conf test is successful
root@mars:~#
구성 테스트가 성공하면 서비스를 다시 시작하십시오 nginx.
sudo systemctl restart nginxDebian 12에 Lemp를 설치하고 구성했는지 테스트하십시오.
Debian 12 (LEP)에서 Nginx, MariaDB 및 PHP를 설치하고 구성한 후 모든 것이 작동하는지 테스트해야합니다. 테스트하려면 가장 간단한 것은 info.php 파일을 만드는 것입니다.
echo "<?php phpinfo(); ?>" | sudo tee /var/www/html/info.php브라우저에 대한 액세스 “https://your_server_ip/info.php“.
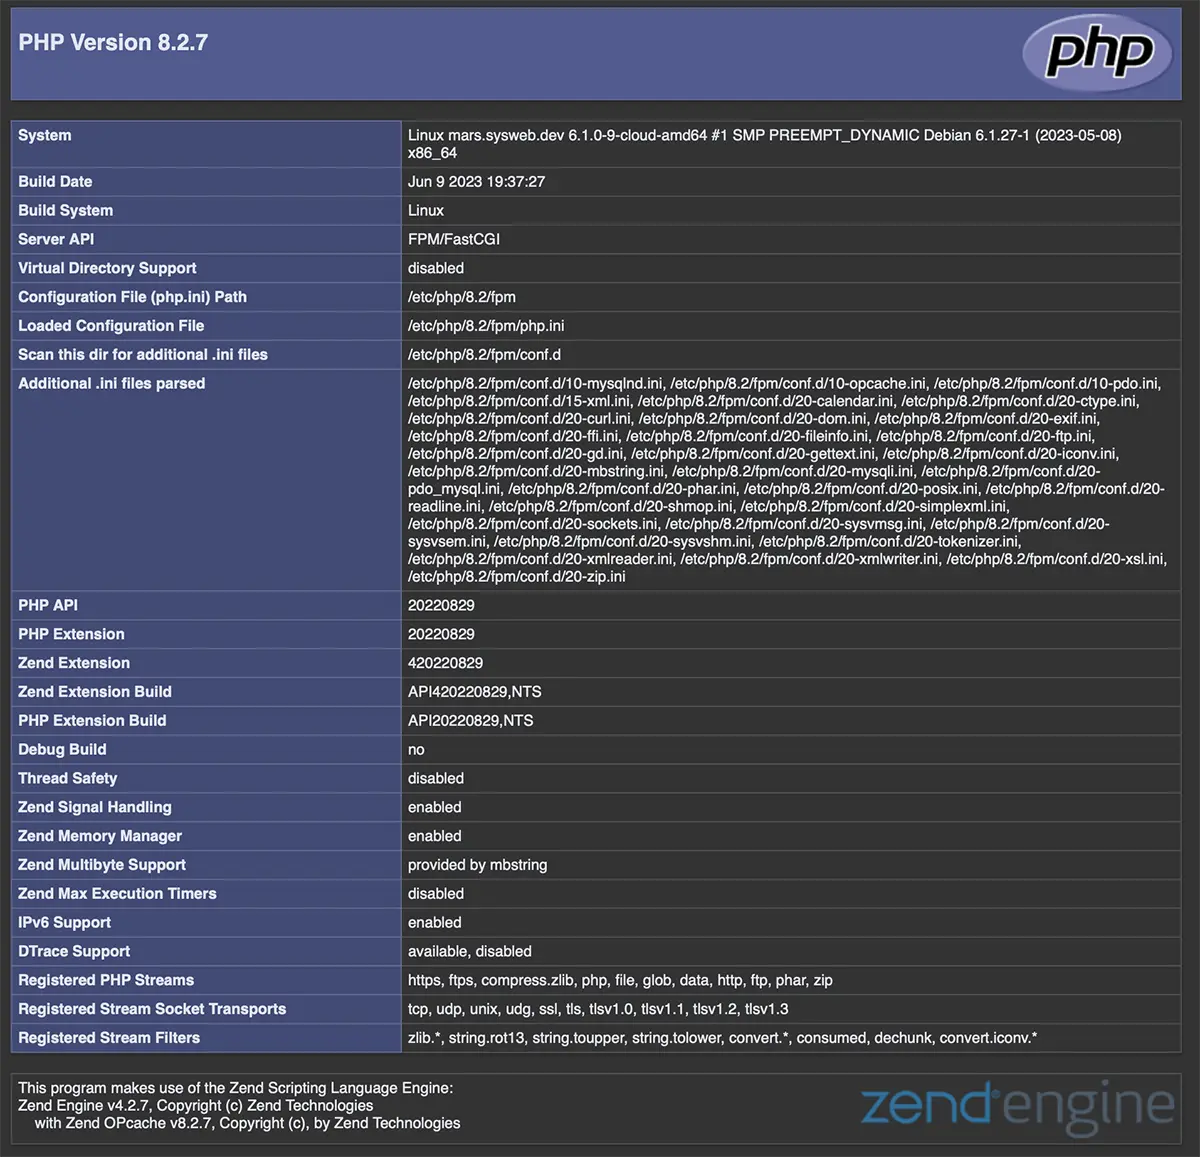
PHP 페이지는 Debian 12 용 Lemp를 성공적으로 설치하는 데 성공했음을 의미합니다.
축하해요!
당신은 또한에 관심이있을 수 있습니다 ...
