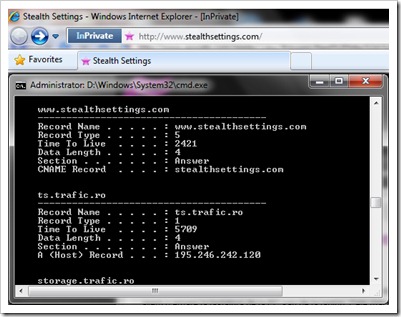
新しいテクノロジーを使用する場合は椅子 “inprivate” a Internet Explorer 8 または “プライベートブラウジング” a Google Chrome、Web サイトを閲覧した後、情報が保存されるべきではありませんが、PC にはまだ何かが残っています。 DNSキャッシュ-ul。

DNS キャッシュを確認するには、それを開くだけで十分です コマンドプロンプト 味わったことがありますか:
ipconfig /displaydnsWindows Vista、Windows 7、Windows XP での DNS キャッシュのクリア、リセット、またはフラッシュ。
プロンプトコマンドで試してみてください:
ipconfig /flushdns次のメッセージが表示されます。
Windows IP 構成
DNS リゾルバー キャッシュが正常にフラッシュされました。
で Windows Vista そして Windows7 それを開けなければなりません CMDと 管理者の特権 DNS キャッシュをクリアします。
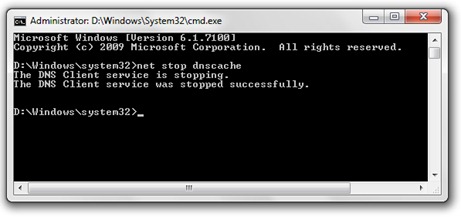
DNSキャッシュを停止する (すべてのオペレーティング システムで有効な方法)
DNS キャッシュを停止するには、コマンド プロンプトを開き、次のコマンド ラインを記述します。
net stop dnscache
または一連の ソフトウェア-uri ウイルス対策 そして ファイアウォール のオプションを提供します DNSキャッシュを無効にする、およびインターネットブラウザ モジラ・ファイアフォックス を提供します アドオン これにより、ワンクリックで DNS キャッシュをアクティブ化/非アクティブ化できます。
Firefox の DNS キャッシュを無効または有効にできます。
https://addons.mozilla.org/en-US/firefox/addon/5914
* についてのアイデアを提供するため DNSキャッシュ そして DNSキャッシュ 中毒、非常に良い記事を見つけました。 ウィキペディア。
無効にする & DNSキャッシュをクリアします – Windows 7、Vista & XP
について ステルスL.P.
創設者および編集者 ステルス設定, din 2006 pana in prezent. Experienta pe sistemele de operare Linux (in special CentOS), Mac OS X , Windows XP > Windows 10 Si WordPress(CMS)。
Stealth L.P. の投稿をすべて表示あなたも興味があるかもしれません...


についての2つの考え “無効にする & DNSキャッシュをクリアします – Windows 7、Vista & XP”
とても助かりました。あなたは何年も私にとって最も役に立ちました!ありがとう!
どういたしまして ;-)