After seeing “How we install certified SSL (HTTPS Connection) for a website Hostat on a server NGINX leave cPanel or VestaCP” In the article here, let's see how you move a WordPress website on HTTP on HTTPS cu NGINX.
For a website or blog with WordPress, it is not enough to install SSL certificate that it is valid on the protocol HTTPS. Even if the certificate SSL It was installed correctly and is valid, you probably noticed that when you access a page HTTPS, in the address bars does not appear “lock”, sign that the page is Safe.
If the blog or website does not appear as having a safe connection (Connection is Not Secure) Even if I installed the SSL certificate correctly, it means that page remained local links “http“. These may be direct links to media files (images, cousins, songs) or to structural elements (java, CSS).
We take the example iHowTo.Tips, which although it has a SSL certified installed correctly and valid, we have a page where Firefox warns us that we do not have a safe connection.
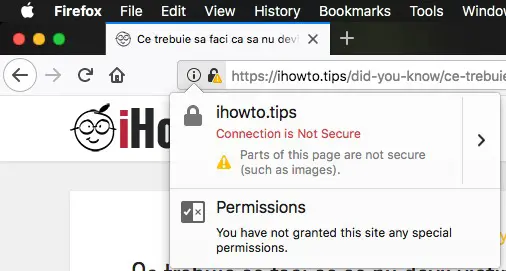
He tells us that they are parties on the page, such as the images, which are not secured. This means that somewhere in the content of the article or on the elements in the sidebar, I had an image file whose link the source begins with “http” instead of “https“.
To change the source of an image from “http” in “https” It would be easy to edit that article. If we talk about a website with hundreds or thousands of articles, the job changes. Editing each article would be an operation that would take a long time. The simplest for WordPress users is to change the local links in database. The passage of links from “http” the “https” can do by a simple order SQL executed from phpMyAdmin or from the order line SQL via Terminal.
How Move WordPress from http to https
If I still mentioned above iHowTo.Tips, let's take it as an example and continue. Let's say we have to replace that blog, all the links of shape “http://ihowto.tips” in “https://ihowto.tips“. These links can be sources of images (SRC) and other links to internal pages.
Before you start the job, we recommend that you make a backup of the database.
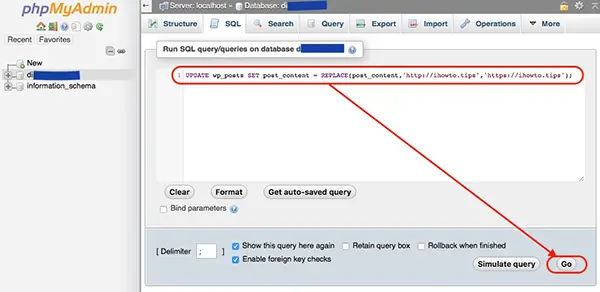
1. Is We authenticate at the database of the blog, through phpMyAdmin. User and password we find them in the file wp-config.php from the root of the domain.
2. We do Click the database name at the left side, then click on SQL in the horizontal menu at the top.
3. We execute in SQL command line:
UPDATE wp_posts SET post_content = REPLACE(post_content,'http://ihowto.tips','https://ihowto.tips');Replace the web address and your domain name and keep in mind whether or not you use www. If you use the prefix “www“, he must also be added.
4. Click “Go” to execute the order line.
The order line indicated above will only change the URLs in the table “wp_posts“, column “post_content“. You can change this order line SQL to replace the URL in all tables of the database.
Careful! Are themes of WordPress (WP Themes) which once changed the URL of the domain will reset their personalized configurations. Seek to make a backup for them too.
You may also be interested in...
