Change the order to connect wireless networks available (Wireless Network Setup – Windows 7)
Change the order to connect wireless networks available (Wireless Network Setup – Windows 7)

At home or at the office, we have several around us rele wireless to which we have access, but as a rule we set only one as the default network to which our laptop connects connect automatically when the network is available. It sometimes happens that the wireless network fails and our laptop tries CONNECTING to another wireless network available. In a location where we have several wireless networks at our disposal, we can establish the connection order ourselves Wi-fi, so that if a network has failed or we have moved away from it, the laptop will automatically connect to the next network indicated by us, from the list of available networks.
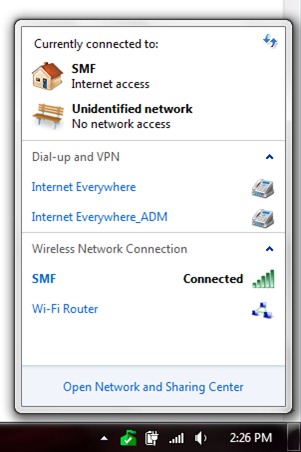
To see what the network list is Wireless saved on our PC and connection order, we click on the wi-fi icon in the lower-right corner, then click on Open Network and Sharing Center.

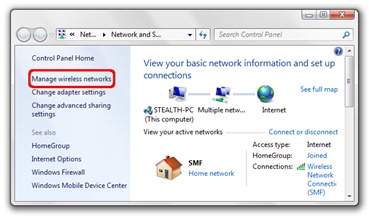
In the panel that opens (Control Panel Network and Internet Network and Sharing Center) we click on the link Manage Wireless Networks.

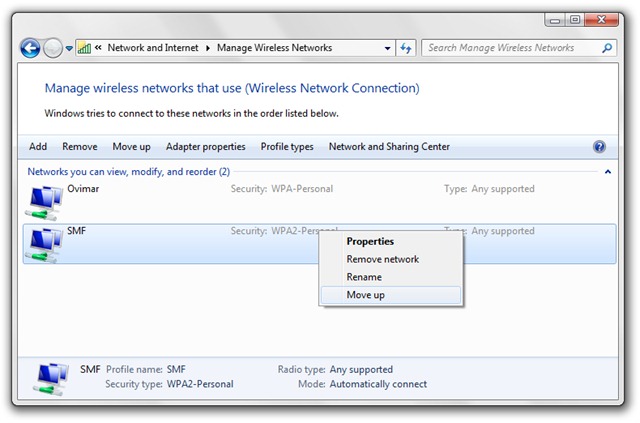
After clicking on Manage Wireless Networks the list of Wireless networks will open. This list contains only the networks to which we had access and which are not necessarily found near us. To set the connection order, select the wireless network to which we want to give priority, then right-click and “Move up“.

If both networks, Ovimar and SMF will be available in our vicinity, the PC will automatically connect to the network that appears first in the list.
The tutorial is especially useful for those who have access to several wireless networks from the same place, and want to define their priority list for connection.
Similarly, it is set in Windows Vista.
Change the order to connect wireless networks available (Wireless Network Setup – Windows 7)
What’s New
About Stealth L.P.
Founder and editor Stealth Settings, din 2006 pana in prezent. Experienta pe sistemele de operare Linux (in special CentOS), Mac OS X , Windows XP > Windows 10 si WordPress (CMS).
View all posts by Stealth L.P.You may also be interested in...


One thought on “Change the order to connect wireless networks available (Wireless Network Setup – Windows 7)”