How to do a bootable USB stick with Windows 7 [Installation Windows 7 on USB Stick]
How to do a bootable USB stick with Windows 7 [Installation Windows 7 on USB Stick]

Last week I had to solve a small problem with one mini-laptop Eee PC Asus that he cracked the operating system (Windows XP). I tried to go into Windows by several methods but none gave results. In addition, the owner wanted to give up Windows XP in favor of the system Windows 7.
Installation a new operating system on a Eee PC It would be very simple if the old operating system were functional and it could launch the installation of Windows 7 below it. Another simple installation option would be with the help of a DVD bootabil, but how we don't have a handy DVD optical unit, the only solution has remained Installing Windows 7 operating system on a bootable USB stick.
How to create a bootable USB stick and how to install Windows 7 on USB Stick.
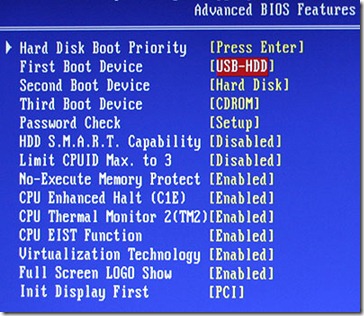
Before you start the insured job that you have a handy USB STICK STICK 3 GB and as the system (laptophis PCthe) you want to install Windows 7 on the USB Stick has a BIOS to allow them booting from external devices. You can check this by entering the bios to “Hard Disk Boot Priority“. If you find the option of boot from USB, you will have to set it at “First Boot Device“.
USB bootable stick with Windows 7 can be created very simply on a Windows 7 operating system. Here The steps to be followed to create a bootable stick with Windows 7 :
1. attach USB stick (preferably be greater than 4GB) your system and make a backup to all data from him. Before becoming USB bootable stick will have to be formatted. After the format all the data on it will be erased.
2. Open Command Promptthe privileges of administrator. Click on Start Menu -> taste “CMD” in “Search programs and files” -> Click-right on “cmd” -> click pe “Run as administrator“.
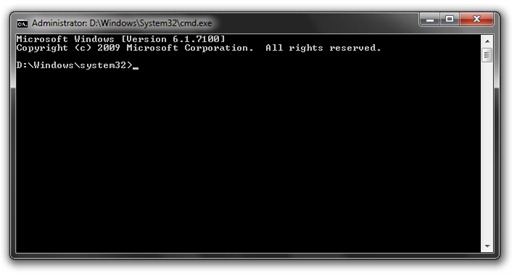
3. In Command Prompt Tab the following orders:
Diskpart and press Enter
LIST DISK and press Enter
After you give List Disk command you will need to identify what number your USB has.

In our case is 7656 MB (Disk 2).
4. Follow a series of commands in CMD through which you will need to format the USB stick. After each order line Press Enter:
SELECT DISK 2 (Check your disk number for your case is very important!)
CLEAN
CREATE PARTITION PRIMARY
SELECT PARTITION 1
ACTIVE
FORMAT FS=NTFS (The format process that can take up to a few minutes will start. Wait until it reaches 100%)
ASSIGN
EXIT
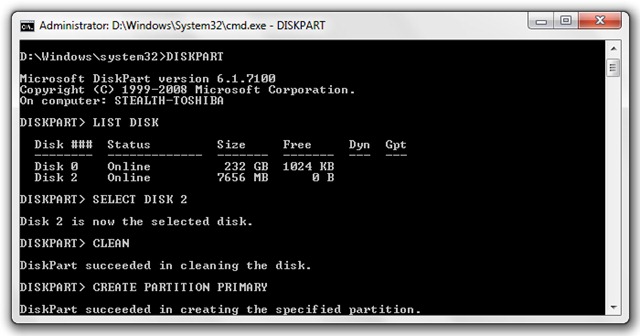
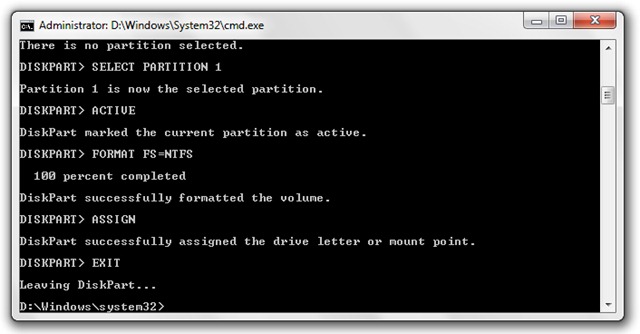
After you finish given these commands and the result is the one in the images above, minimize the CMD and Enter DVD with Windows 7 in the optical unit.
5. Identified drive letter-ul (letter) USBto the one and the one of DVDto Windows 7.
In our case F is the optical unit, and J is the USB stick.
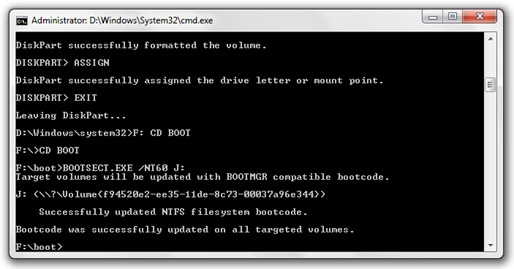
6. After entering the DVD with Windows 7 and identified the two devices drive, return to CMD and type the following commands:
F: CD BOOT and press Enter. F is DVD Drive Letter.
CD BOOT and press Enter.
Bootsect.exe / NT60 J: (J is the USB stick)
After these orders you will receive a message like:
Target volumes will be updated with BOOTMGR compatible bootcode.
J: <?Volume{f9452….}>
Successfully updated NTF filesystem bootcode.
Bootcode was successfully updated on all targeted volume.
7. Copy the contents of the DVD with Windows 7 on the USB stick. Copy & Paste.
At the end of the copy process you have a USB Stick bootabil with Windows 7. Follow Installing Windows 7 from a USB Stick.
Installation Windows 7 (from USB Stick) on an EEE PC (or on a laptop / pc without DVD optical drive)
1. Attach the USB to the laptop (with the closed laptop)
2. Porniti laptop-ul si selectati din Boot Manager (apare imediat dupa pornire o optiune) stick-ul dvs.
3. Follow the standard Windows 7 installation process.
This tutorial was tested by us on a Eee PC ASUS. The bootable stick was created on Windows 7.
In the case of Windows XP operating systems it is possible that the above tutorial will not be helpful. I will do soon and a stick bootabil cu Windows XP And I'll test.
We return ;-)
How to do a bootable USB stick with Windows 7 [Installation Windows 7 on USB Stick]
What’s New
About Stealth L.P.
Founder and editor Stealth Settings, din 2006 pana in prezent. Experienta pe sistemele de operare Linux (in special CentOS), Mac OS X , Windows XP > Windows 10 si WordPress (CMS).
View all posts by Stealth L.P.You may also be interested in...


65 thoughts on “How to do a bootable USB stick with Windows 7 [Installation Windows 7 on USB Stick]”