How can we assign a static IP address to a computer with Windows

If you have more computers cu Windows (or other devices) connected to the same network and use DHCP (Dynamic Host Configuration Protocol) for the connection, each computer/device in the network and will be assigned a Different IP address by each date when they will be started. This can cause sometimes address conflicts Between computers, and will also require checking IP addresses whenever various network errors will have to be resolved.
To avoid IP conflicts and easier administration of computers and network, it is recommended assigning specific IP addresses each computer in the respective network.
How do we assign an IP address static to a computer with Windows?
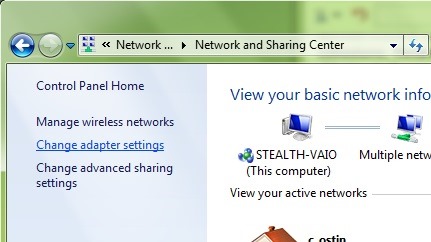
- open Control Panel you navigate catre Network and Internet > Network and Sharing Center
- In the open window, click on the link Change adapter settings displayed on the left side
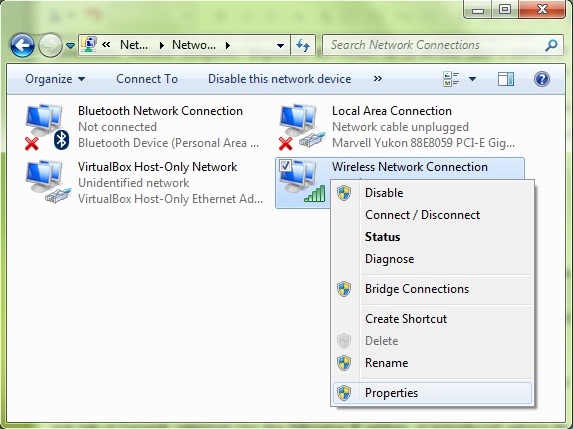
- then click-right on the network adapter (Local Area Connection If you are connected to the cable network, or Wireless Network Connection If you are connected via WiFi) and select Properties
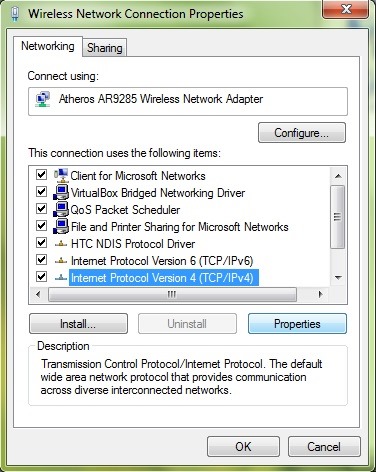
- In the Selected Properties window Internet Protocol Version 4 (TCP/IPv4) and click on the button Properties
- under the tab General, select Use the following IP addres, and enter IP address that you want the computer to use, Subnet mask and Default gateway, then, below Use the following DNS server addresses (this option will be selected automatically) enter Adresa DNS (This may be the one offered by ISP, or may be the address of a DNS public such as Open DNS or Google DNS)
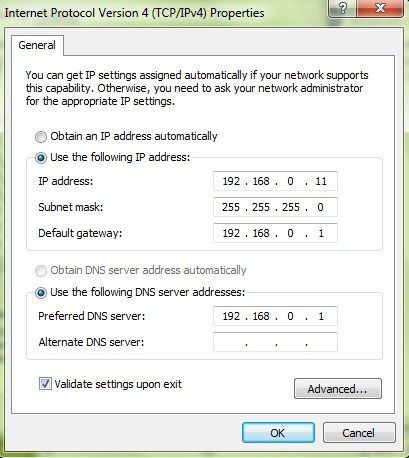
- to find out Subnet mask, Default gateway and Adresa DNS, open one Command Prompt If you taste ipconfig /all; also, IP address must be similar but not the same, cu Default gateway or The address of the router, and must end with a number between 1 and 254 (for example, if Default Gateway is 192.168.0.1, selected IP address can be any between 192.168.0.2 and 192.168.0.254)
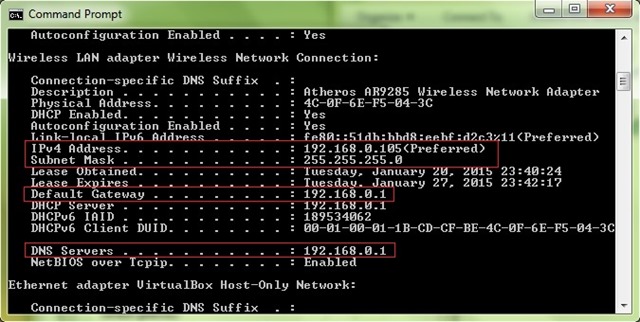
- After entering the necessary addresses, tick the option Validate settings upon exit, and click on OK; the system will run an test to diagnose if there are problems with the connection (this is Automatic verification, to identify any fall; If they exist, they can be resolved by running network troubleshooting wizard)
And ready. After you do these SETTINGS, your system will have attributed a Static IP address, which will not change every time it will boot. If this is the case, repeat the same steps and for the others computers with Windows from the network.
STEALTH SETTINGS – How to assign astatic IP address to a Windows PC
How can we assign a static IP address to a computer with Windows
What’s New
About stealth
Passionate about technology, I like to test and write tutorials about Windows operating systems, seeking to discover interesting things.
View all posts by stealthYou may also be interested in...

